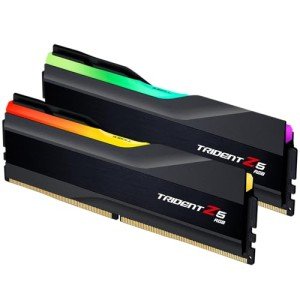
Memory overclocking enables users to enhance DDR performance by increasing operating frequencies and fine‑tuning timings. This approach delivers faster data access and improved multitasking, crucial for gaming, content creation, and other high‑performance tasks.
Effective memory overclocking begins with determining the rated speed and timings of your RAM modules. Gradually adjusting frequency increases while monitoring system stability and latency is key. Fine‑tuning CAS latency, RAS precharge, and other timing parameters through the BIOS ensures optimal performance without compromising system reliability. Stress testing and benchmarking are essential at each stage to validate improvements and monitor thermal impact.
Balancing voltage increases with proper cooling is critical to avoid damaging memory modules. Using recommended voltage limits and high‑quality memory kits can mitigate risks associated with aggressive overclocking. Document your settings and rollback if instability persists, ensuring that each incremental change is sustainable under load.
Advanced DDR overclocking techniques allow you to optimize memory performance for a high‑performance PC. By carefully adjusting frequencies and timings and validating settings with rigorous testing, you can achieve lower latency and faster data processing while maintaining overall system stability.
Ultimate DDR Overclocking Guide for Maximum Memory Performance
Introduction: The Value of DDR Overclocking
Pushing your DDR memory beyond factory settings can yield significant gains in bandwidth and latency, translating to smoother gameplay, faster rendering, and more responsive applications. Manual tuning goes deeper than preset profiles, offering granular control over every timing and voltage parameter.
In the following guide, we’ll explore DDR architecture fundamentals, step-by-step tuning methods, stability testing, and advanced techniques—equipping you to achieve reliable, high-performance memory overclocks on any modern platform.
DDR Memory Architecture Essentials
- Dual-Data Rate Operation: Transfers data on both clock edges, doubling throughput per pin.
- Channels & Ranks: Single-, dual-, or quad-channel configurations affect total bandwidth; single-rank vs. dual-rank modules influence timing headroom.
- Integrated Memory Controller (IMC): Built into the CPU; its quality varies by silicon stepping and impacts overclocking potential.
- SPD and XMP/DOCP Profiles: SPD provides safe JEDEC defaults; XMP or DOCP presets enable higher speeds with looser timings.
Advantages of Memory Overclocking
- Gaming Performance: Faster asset streaming and lower latency boost FPS in CPU-bound titles.
- Content Creation: Increased throughput accelerates video encoding, 3D rendering, and large dataset processing.
- Multitasking & Virtualization: Enhanced memory responsiveness improves VM performance and seamless application switching.
- Benchmark Success: Competitive overclockers leverage tuned memory to top memory bandwidth and latency charts.
Pre-Overclocking Checklist
- Motherboard Compatibility: Verify QVL support and ensure your BIOS exposes timing and voltage controls.
- CPU IMC Quality: “K” series Intel and Ryzen “X” processors typically deliver wider memory speed margins.
- Memory Kit Selection: Choose matched, high-bin modules rated at 3200 MT/s or above for best headroom.
- Power & Cooling: Use a reliable PSU and maintain good airflow or active DIMM cooling to prevent thermal throttling.
- Monitoring Utilities: Install hardware monitoring tools to log voltages, temperatures, and error events.
BIOS vs. Software Overclocking
| Approach | Advantages | Drawbacks |
|---|---|---|
| BIOS/UEFI | Direct hardware access; full timing control | Requires reboot; steeper learning curve |
| Software Utilities | On-the-fly adjustments; easy profile switching | Potential OS instability; limited deep timing tweaks |
Key Memory Timings Explained
| Timing | Description |
|---|---|
| CAS Latency (CL) | Cycles between read command and data availability |
| tRCD | Delay from row activation to read/write command |
| tRP | Precharge time before accessing a new row |
| tRAS | Minimum time a row remains open |
| tRFC | Duration for a single refresh cycle |
Step-by-Step Overclocking Workflow
- Enable XMP/DOCP and record baseline bandwidth and latency.
- Raise DRAM frequency in 200 MT/s increments, testing POST success each time.
- Loosen primary timings by a couple of cycles to regain stability at higher speeds.
- Increase VDIMM in 0.02 V steps—do not exceed kit specifications.
- Tighten primary timings (CL, tRCD, tRP, tRAS) one cycle at a time.
- Fine-tune secondary settings (tRFC, tWR, tWTR) for further improvement.
- Validate with extended stress tests (MemTest86, mixed-load torture tests).
- Save stable profiles in BIOS for daily use and benchmarking.
Voltage & Thermal Considerations
Memory voltage and module temperatures are critical to long-term reliability. Follow these guidelines:
- Stay within manufacturer’s VDIMM limits (typically 1.35 V–1.45 V for DDR4).
- Adjust CPU IMC voltages (VCCIO/VCCSA on Intel, SoC on AMD) to stabilize higher speeds.
- Employ active or passive DIMM cooling to keep temperatures below 60 °C under load.
Benchmarking & Stress-Testing Tools
- MemTest86 – bootable memory check suite for multi-threaded patterns.
- AIDA64 Memory Benchmark – measures read/write/copy bandwidth and latency.
- Prime95 Blend Test – stresses CPU and RAM together for real-world validation.
- Karhu RAM Test – configurable patterns to expose rare errors.
- HCI MemTest – runs inside the operating system to catch live-usage glitches.
Advanced Tuning Techniques
- Customize XMP presets by editing individual timing entries in BIOS.
- Experiment with Gear ratios on DDR5 platforms to balance IMC clock versus memory clock.
- Use sub-ambient cooling (Peltier or phase-change) for extreme frequency records, ensuring proper insulation against condensation.
- Consider hand-binned IC kits on custom PCBs for ultra-tight timings and very high speeds.
Common Pitfalls & Troubleshooting
- POST Failures: Reset BIOS, reduce frequency or loosen key timings.
- Intermittent Crashes: Raise memory or IMC voltages slightly and verify PSU stability.
- High Latency: Tighten one timing parameter at a time and retest.
- Overheating Modules: Improve airflow or attach dedicated DIMM fans.
Best Practices & Safety Guidelines
- Make incremental changes—frequency first, then timings, then voltage.
- Document every setting so you can revert individual tweaks without resetting all parameters.
- Maintain clean memory slots and cooling hardware to preserve thermal headroom.
- Use profile backups in BIOS and export settings to USB for quick recovery.
Real-World Overclocking Case Studies
- Core i9-12900K + DDR5-6000 Kit: Baseline 5600 MT/s CL36 @1.25 V → Stable 6200 MT/s CL34 @1.35 V. Result: +10 % memory bandwidth, –2 ns latency, +4 % multi-core performance.
- Ryzen 9 5900X + DDR4-3600 Kit: Baseline 3600 MT/s CL16 @1.35 V → Stable 4000 MT/s CL18 @1.40 V with SoC +0.05 V. Result: –6 % latency, +6 % in compression benchmarks.
Implementation Roadmap
- Measure baseline performance and stability.
- Enable XMP/DOCP and verify stock results.
- Increase frequency cautiously; test each step.
- Loosen and then tighten timings for optimal balance.
- Adjust voltages within safe limits.
- Validate with extended stress-testing.
- Save and document stable profiles.
Conclusion
Mastering DDR overclocking empowers you to unlock extra frames in games, accelerate content creation, and optimize complex workloads. By following a structured approach—understanding architecture, tweaking one variable at a time, and rigorously testing—you can achieve stable, high-performance memory configurations tailored to your system.
Armed with these techniques and best practices, you’re ready to push your RAM beyond its limits and enjoy a smoother, more responsive computing experience.

